Drywall panels are typically produced in lengths up to 16-ft and standard widths of 48 and 54 inches. The long edges of drywall panels are tapered slightly to accommodate joint tape and compound. The panel ends are cut square and finished smooth with the gypsum core exposed, and are thus un-tapered. Similarly, whenever a contractor or other drywall 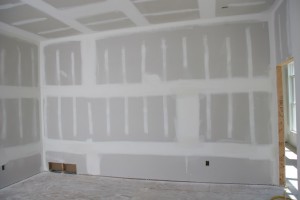 installer cuts a drywall panel, the cut edge is of course un-tapered. When professionals hang (attach) drywall, they are always thinking of eliminating unnecessary joints. WHY? Less seams to tape less potential problems. The tapered edge seams are designed to be easy to conceal. The recess allows room for the tape embedded in compound without creating a bump but still drywall contractors who care are even trying to reduce these tapered edge seams
This article is about butted seams which I personally have never been able to accept.
1) My first rule is to try and avoid having any butted seams. This is done by using longer lengths of drywall. Rooms 16 feet or under should not have any butted seams. I do mostly residential jobs where the walls are traditionally hung horizontally, so if a wall is over 16 ft long it will have butted seams. Ceilings are hung perpendicular to joists of furring so if the room is over 16 ft long perpendicular to the joists then the ceiling will have butted seams. So sometimes the butted seam can’t be avoided.
2) Second I try and locate the butted seams in the least visible (easiest to conceal) location. This may be over or under a window header, over a door header, close to the perimeter of the wall or ceiling, and I often consider placement where the seam will be concealed by an open door or furniture when occupied.
3) Third I back block all my butted seams with a RockSplicer ™ whenever possible. Back Blocking (a method of attaching additional framing to support gypsum board where no framing is present) is a proven practice that virtually eliminates the very real problems associated with butted seams in drywall. The problems being the bump created when drywall is attached to standard framing and then finish taped and also the subsequent ridging and cracking of butted seams.
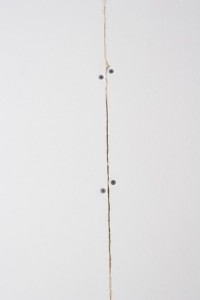
When it becomes necessary to butt the un-tapered ends of panels together, for instance on any wall or ceiling over 16-ft long, a butt joint is formed. If no modifications are made and the ends are attached directly to standard framing, the seam that is formed is difficult to conceal. The main reason for this is that the cut drywall edge at the seam is not tapered at all. Once joint tape and compound are applied, a slight bump is formed and even a highly skilled professional has a difficult time hiding the joint, particularly under certain lighting conditions. Additionally building materials expand or contract as the temperature and humidity inside a building change. As the building materials move, tension builds up against the drywall panels. The tension is relieved as the panels bend outward usually at a joint. This ridging can occur in regular tapered edge seams; however it is much more common in butted end joints. This is because the butted seam is attached along a single stud or joist which is typically only 1 ½ inches wide. The screws are often angled somewhat and are too close to the drywall edge which damages the drywall core and weakens the attachment.
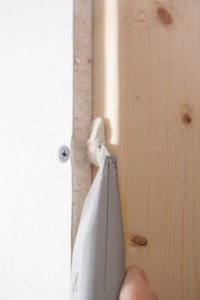
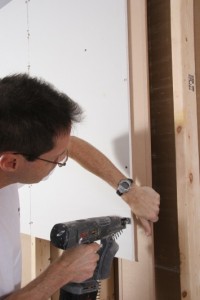
Butt seam first panel attatched to stud.
Screw had to be located close to drywall
edge and as a result drywall core was damaged.
Adhesive was used to help stabilize the seam but it will still be a bump when finished.
The back blocking device that I have been using for years is called a RockSplicer ™ and is made by Wilco Tool( www.wilcotools.com). It is designed to minimize ridging in the first place by allowing butt joints to readily be placed between framing members, and to pull the drywall in slightly along the joint to compensate for the absence of tapering along cut drywall ends. The device and method also makes it easier to form a good finished surface over a twisted stud or joist.
The combination of the seam being essentially a floating seam and also being pulled in is what greatly reduces joint ridging. NOTE: The seam is intentionally floated between the framing close to the center of the wall or ceiling cavity. It does not occur only when the seam falls by chance between the framing.
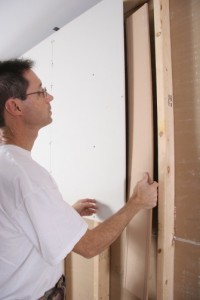
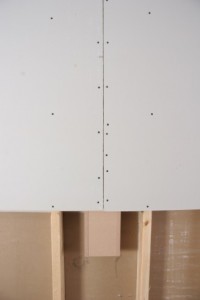
The first sheet of drywall was cut so that the seam is located between the framing
The RockSplicer is then slid behind the seam and attached by screwing through the drywall and into the RockSplicer along it’s center.
The second panel is attached to the RockSplicer. As it was fastened the drywall was pulled in slightly because of the slightly raised edges of the RockSplicer.
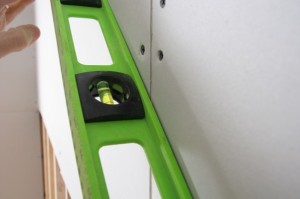
The recess is evident when a straight edge is placed over the seam.
In the USG Handbook there is a section where back blocking is discussed and a method that USG developed is described, along with a list of benefits. www.usg.com. I have installed thousands of manufactured backblockers over for years with excellent results and have eliminated any problems I previously had with butted seams. Having a back blocking device such as the RockSplicer ™ , which is a proven performer, to use behind all my butted seams has been a great attribute to my Drywall Company. It eliminates one of the last major problems with drywall finishing: “The Butted Seam”
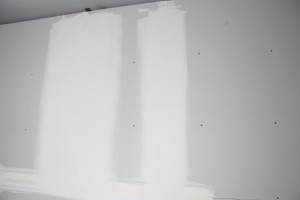
The butted seam on the left (attached to framing) is finished over 30 inches wide and is still a bump. The seam on the right (attached to a RockSplicer) is a flat seam finished 12 inches wide.
Below are results of some cost analyst I did a few years ago. I have mixed feeling about talking about cost because I believe that even if it did cost an extra 4 dollars per seam that is irrelevant because long lasting quality is what a professional contractor should be concentrating on. I also hate having to go into my talk about offering quality and being a step above the competition and so on and on. But for whatever it is worth here is the cost analyst.
Results of comparison of regular butt seams and butt seams with RockSplicers installed
Variables: $15 a bucket for compound
$25 an hour for labor
hand taped (average of 12 seams).
Used lightweight compound.
Regular Butt Seams:
Time: 6 min $2.53
Compound: 3.5 lbs $1.30
Width: 32-in $3.83
RockSplicer Seams:
Time: 2 min 12 sec $ .92
Compound: .70 lbs $ .26
Width: 12-in $1.18
Cost Difference:
Regular Seam $3.83
Back blocked seam – $1.18
Money saved $2.65
Cost Of RockSplicer $3.75
Less Amount Saved -$2.65
Adjusted Cost $1.11
Each RockSplicer cost $1.11 to install and finish. “A Small Price To Pay For The Improved Quality”
Other factors to account for:
- Flat butted seams instead of bumps (can achieve a true level 5 finish)
- No call backs for poorly concealed seams or ridged seams
- Reduced drywall waste
Showing the customer that you will be using the RockSplicers will help you land the job. All in all it is about doing quality work. For more information go to www.wilcotools.com
© 2013 Myron R. Ferguson
You sold me on the RockSplicer. But is there a limit to its usefulness? I have several large rooms where the butt joint will be above or below a window. The butt joint will be only 1′ to 2 1/2′ long. Would you still use a RockSplicer there? i.e. at what point is the bending-in affect diminished by short spans (with stiff support on the top and bottom)? Even if you don’t get full advantage of the bending-in affect, is mid-span support still better than matching studs?—- ridging,cracking,screw placement, etc.
It comes in 53″ lengths. What do you do for 54″ sheets?
For a wall full of spray foam insulation, do you scrape out some of the foam, or just mash-in the RockSplicer?
Hi Jay,
I use the RockSplicer where ever I can. I just score it a few times with a utility knife and snap it apart. If there is room for one then use it. It may not create much of a recess sometimes but because the joint is off the framing it is less likely to crack.
The 53 inch length will work fine with 54 inch high drywall. You can still lap the adjacent sheet of drywall because of the top and bottom plates and you can also leave it away from the plates an inch or two to get a little more lap. Although you don’t have to lap the other sheet.
Most of the time there is a little concave area between the framing members to allow for the RockSplicer. If not I carve out the foam a little. The spray foam guys may not like this so just make sure to use long lengths of drywall to reduce the amount of butted seams. If attaching to framing is the only option then try to locate the seams above and below windows or away from the most visible area of the wall or ceiling.
I read your book “Drywall”, 4th edition, and watched the accompanying video–very informative.
I’m planning my takeoff right now using your techniques and especially the RockSplicer technique, and staggered butted seam technique. However, I’m confused about the staggered butted seam issue. I was on board with using the longest panels possible and staggering seams, until I watched your video segment doing the vaulted ceiling. There you recommended aligning all the butted seams because you’re using the RockSplicer. So, my question is why would you not also do this on all ceilings (like regular flat horizontal ones) and on walls?
1) Does the RockSplicer eliminate the need to stagger butted seams?
2)The reason I ask is that I have some long rooms with regular flat horizontal ceilings, so I will obviously have butted seams. Do you recommend staggering butted seams, or do you recommend using your vaulted ceiling technique in the video that aligns the butted seams? Same question for long walls.
3) One room is 30′ long, so I thought it might be wise to put an expansion joint near the middle of the room. This would mean that I would have all the butted seams in line. My question here is should I place the butted-seams (and expansion joint) at mid-frame using a RockSPlicer, or does it matter with an expansion joint? Will an expansion joint work properly used in conjunction with a RockSplicer or should the expansion joint be at a framing member?
4) What other publications or videos do you offer? Is 4th edition the latest of “Drywall”?
1 and 2). The butted seams can be all aligned or can be staggered. On larger ceilings where there will be more than one per run I often stagger the seams because this method results in less drywall waste. Lets say a ceiling is 28 ft long and I am using 12 ft drywall on that ceiling. I would cut 4 ft off a 12 ft piece to finish the first run. I would then start with the 8 ft cut off piece for the next run. This is the traditional way to hang but I am still having the benefit of using a RockSplicer. Builders are accustom to seeing a ceiling or wall hung with staggered butted seams so they prefer this method. Aligning all the butted seams may also result in minimal waste so that is fine also. I prefer taping these jobs because there is less blending in of intersecting seams when taping.
Sometimes if framing members are bowed out or in excessively using the RockSplicer does not pull the seam in properly, so after hanging the first run with the RockSplicers just check with a straight edge to see how well it has pulled in. If it is good then continue placing the butted seam in that location.
3). The actual location of the break in the drywall where the control joint will be located is floating, (not attached to the framing). The gap in the drywall should be about 1/2″. Separated studs should be used on each side of the control joint. Typically when I install control joints on a ceiling the ceiling has 3/4 ” furring attached to the joists. An extra furring strip is just attached a few inches from the location of the joint.
4). I have lot of videos on line With Fine Homebuilding and Journal of Light Construction. As well as on youtube.
The 4th addition is my latest version of the book. Fine Homebuilding does offer copies of articles I have written as well as just portions of the book.
All the best,
Myron
When using RockSpicer, the butt joint on the floor and ceiling are not floating. How do you handle this?
The last few inches where the drywall is attached to the top or bottom plate along the butted seam on a wall will not be pulled in when using the RockSplicer. But those areas are less conspicuous so it is not a problem. Just feather in with joint compound as necessary.
Hi Myron, Picked up your 4th edition at our local Menards. I’m remodeling both bathrooms…there isn’t much mentioned in the book or DVD regarding these rooms. Do you have any videos addresses these special needs rooms? Thanks from a 30 Yr USAF Retired Combat Veteran!
I don’t really know what information is available. I don’t have much.
The best advice I have is to make sure the room is well air sealed and ventilated. Having a vent that runs for a period of time after the shower is off will help dump the moisture. Sometimes having a fan switch that runs when the humidity reaches a certain point is even better.
Hello Myron. I just finished reading your 4th addition and have a question. Great read, by the way. My basement is 30 x 60, with a height of 9′. I am planning on keeping it more less open. The foundation walls are ICF and so far my contractor has 1 x 4 strips running horizontally. Because I read your book, I am concerned with butted seams. I am wondering how you would hang your drywall. If I went with 4 x 9 drywall, I could hang it vertically, which would eliminate the butted seams, but I’d have more seams to tape. If I went horizontally with 54″ drywall, I’d have several butted seams. If I went horizontally, could I cut out a section of the 1 x 4 strips where the butted seams would fall, and put in a RockSplicer? Any recommendations would be greatly appreciated. Thanks
Hi Aaron, If you hang vertically you will have about 25 more feet of seams to tape on the 60 ft wall. But it may be easier to get the 4 by 9 panels down in the basement than the 12′ by 54″ drywall. I like less seams and backblocked butted seams so if possible to get materials down I would choose the vertical job. Cutting away the furring to use RockSplicers is a good idea. One thing to keep in mind is that you will need expansions joints on these long walls and ceilings. Any wall or ceiling 30 ft or over has to have an expansion joint. I use the Trim-Tex expansion/control joints http://www.trim-tex.com Hope this helps, Myron
1)I have some questions regarding the use of Hardibacker in bathrooms. Obviously it’s used at showers. But there are wide and varied opinions about the extent of use in the rest of the bathroom—like on a wall or ceiling section that doesn’t get, or rarely/barely gets, splashed on. So, if you decide to go whole hog and cover the entire bathroom with Hardi, then you’re covered. OK, but that presents other issues. The following questions are for Hardi in this “not really wet” category
So, now you have all butt joints since Hardi isn’t tapered.
a) Do you use the RockSplicer with Hardi—-not in the shower, but in the rest of the room? Would it work with Hardi since Hardi is very stiff? Marketing idea—–cement based RockSplicer called RockSplicerC ???
b) If not a RS, then you’re just stuck with a butt joint and all it’s problems, right? Or are there other ways to minimize the problem?
c) If attaching to a 2x stud or joist, then you’re screw is only 3/8″ from the edge of the Hardi? Is that OK? Doesn’t seem good.
d) Hardi and others recommend a 1/8″ gap between sheets. Then some say finish with Alkali Resistant Mesh tape and regular mud. Others say to finish with ARM tape and thinset (making sure you fill the gap with thinset so that the wall all moves as one unit when the framing expands/contracts). Some contractors claim the thinset approach will eventually crack. What’s your opinion on all this? What do you use?
e) Is the use of ARM tape and corrosion resistant screws required because of alkali in the Hardi or in the thinset? Is that why you can’t use paper tape?
2) For Hardi in general (wet area or almost dry),
a) if you need to hang one piece on top of another (for geometrical reasons), how is that done? Or is it even acceptable?
b) If you need to bend a narrow piece along a shallow arch (say a 4 1/2″ wide piece on a 10′ radius), would you be able to do that with the 1/4″ Hardi? 1/2″ seems like it would be way too stiff. Would it help to wet it like you would with gyp? This would be in an area that needs Hardi for a tile substrate or for fireproofing.
c) How do you finish an outside corner of Hardi? ARM tape and thinset, or plastic corner bead, or….? Best to use thinset or regualr mud?
3) I read your book–It was extremely helpful. Suggestion for the next edition—more info on cement board.
Bend a piece in half for closets by scoring the back side of the rock (brown side) and breaking it without cutting the papered side. …..no seams in tiny areas
For Bends wet it down with a sponge or use 1/4 high flex your framing will need to be 8 to 12 on center to accommodate the bend
For a tight radius like 10 inches use a sauna tube form and rough it up with sand paper before skim coating
Hi Matthew, Yes this is good advice. Just make sure that the score is very straight or the face paper will loosen in areas.
Myron
Paper tape and coating mud are not moisture resistant use mesh tape .
Using mesh or fibafuse tape does means you are using an inorganic tape but the compound is still the problem. Setting compound is more resistant to water damage but I don’t believe it is mold resistant. CertainTeed does make a mold resistant compound but it is not very available maybe because nobody knows it exists.
Myron
Basement Wall is about 11 ft long..i have three 4 x8 sheets of drywall. (too hard to get 4 x 12’s down basement…
Do you recommend vertical install or horizontal..if horizontal would the prefered method be to put one sheet above other..and then put the other board vertically.or using a stagged approach….please explain how you would do it….i’m going to have a professional complete the mud job.
Hi Greg, I would just hang the drywall vertical. That way you will avoid any butted seams. You are going to have 16 feet of seams to tape no matter what so best if none are butted seams. Just make sure that the studs you have the two seams on are not crowned out.
Myron
Hi Myron,
I dry walled my basement and a few of my butt joint were perpendicular to the studs, so there were a few that cracked down the the seam. I am a DIYer and at that time I did not know that butt joints had to be fully backed, unlike the long taper joints. I dug out the joint and am trying to find a solution before I retape and mud. The wall cavity was fill with ridgid insulation, so there is just a small space behind the drywall. I was wondering if I put some small hole in the seam and sprayed in some great stuff spray foam if that would make the joint solid enough to refinish? If not is there another solution without tearing out the drywall because the room is already done and primed with just a few seams cracked.
HI Brock, I think your idea of spraying in some foam will work. Don’t overfill which could cause the seam to push out and create a bump which would be a very difficult seam to hide. Paper tape is the strongest tape so that will work best at preventing cracks. But I really like the extra strength mesh tape from FibaTape. If you use the mesh tape be sure to embed in a setting compound.
All the best,
Myron
Should I expect future problems? I’m a Vertical ONLY diy-er & really don’t see a case for Horizontal EVER. Because, Horizontal puts a defect hump in the wall (Rocksplicer minimizes), it ruins Fire Resistance (due to —>) & the tapered seam is ALMOST completely unsupported. My observation is that unsupported, by framing or real blocking, is what brings the seam to the surface & beyond the tape separator & topcoat dressing scab setup. I also line-up my ceiling butts (2″x4″ bridging backed) to the outside, so I can do them away from window glare & process them with the ceiling corner. I know it’s a lot, but would you agree with all of this or could you give me your take on most of it?
VERTICAL, here’s the proof & truth! ______ Iggy 01/26/16
Why HORIZONTAL’S WRONG (& why Vertical’s right)…don’t ruin new from the start:
1 – DEFECTIVE SEAM – Horizontal rows longer than the panel CREATES (instead of AVOIDS) a butt joint, they’re NOT flat, they’re a DEFECT. Outlet & switch cover-plates, window & door trim, baseboards, pictures & mirrors, cabinets, etc. don’t sit flat. Crap like “RockSplicer” is a joke, See #2 below.
2 – UNSUPPORTED SEAM – Horizontal’s tapered edge is MOSTLY unsupported, only 10% (instead of 100%) contacts framing, the seam WILL & DOES crack. Light switch & countertop electrical boxes in the seam equals more weakness & butt joint efforts. “RockSplicer”, are you kidding, COMPLETELY unsupported, that’s a BREAK not a crack in your future.
3 – STRUCTURAL DEFECT – Horizontal only reinforces a wall height of 4’ or LESS & taller walls don’t get the top plate connected to the bottom plate, See #2. Frictional contact is MINIMIZED (instead of maximized).
4 – SEAM DECEPTION – Example 1: 48” tall by 102” long wall, Horizontal = 48” & it’s a butt joint (Vertical = 96” of easy joints). Example 2: 96” tall by 102” long wall, Horizontal = 198” (Vertical = 192” of easy joints)…Horizontal = 50% butts & in a kitchen = 100% (Vertical = 0%).
5 – ANGLE ERROR – Horizontal only uses ONE of the tapered edges & PUTS the other taper at the ceiling corner & baseboard CREATING (instead of AVOIDING) a twisted angle that MUST be shimmed or ADDITIONALLY mudded.
6 – UNFRIENDLY SEAMS – Horizontal celebrates the torso seam & PRETENDS there’s no floor to ceiling butt-joint that needs to be done & DRY before doing the ceiling corner (Vertical has easy joints & the top is done later with the ceiling corner).
7 – FIRE VIOLATION – Horizontal only fills the seam front & has no backing, inviting fire’s spread & air for the fire (Vertical is full depth & airtight).
8 – UNSAFE INSTALLATION – Horizontal needs 2 people for a safe installation & the panel is airborne, GIVEN the chance to CAUSE injury (Vertical easily tilts-up with 1 person).
9 – ADDITIONAL WASTE – Fully span a knee or half wall, tub front, column or soffit with both tapered edges removed…Horizontal CAN’T use the tapers (Vertical can & does).
10 – SELFISH IGNORANCE – Foundation & Framing crews go to great pains to make everything flat, level, plumb & square. Horizontal ruins it, See #1 (Vertical keeps it).
Only promote Horizontal as WRONG based on the above incontestable FACTS.
You seem a little obsessed by this topic. All I can say is that I work in residential construction and have hung and taped hundreds of homes and 99% horizontal and perpendicular and have had little to no problems and so have 99% of the pros.
I do use RockSplicers on all my butted seams so I am not afraid to have butted seams. I almost never hang drywall vertical. It creates too many seams and seams that are often difficult to hide. Horizontal is the way to go on walls. Ceilings should be hung perpendicular to joists/furring and long sheets should be used to locate seams away from visible areas and to reduce the number of butted seams.
I love this response. I have always enjoyed your drywall articles in fine homebuilding and now I like your style a bit more. Glad you put yourself and your ideas out there!
New gyproc was put on the walls then mesh tape and compound was applied. When this was completed some of the butt seams have cracked. Too bad we did not know about the RockSplicer. Does the tape and mud have to be removed and redone in order to solve this problem..Help!!
Hello,
Thank you for this valuable information. I am finishing my basement. I have half of the basement is a half wall, with the top half already drywalled. I framed the bottom half which is about 4 ft high. I am confused however, with the article because it says to avoid butted seams whenever possible, but in one of your replies you advised to always hang horizontal. If I place the drywall sheets vertically on the half wall, I will avoid any butted seams, but I will have more seams to tape. If I lay the 4/8 panels horizontally, I will have all butted seams and not tapered seams. Would you recommend vertical panels in with more seams or horizontal panels with less seams, but all butted seams. The longest length of wall is 22 ft. I also have some of the basement as 8 ft walls. The ceilings are not going to be finished, just painted black. Do you recommend vertical sheets for the full heights walls as well? That would avoid any butted seams, but goes against your recommendation of horizontal panels. Thank you in advance for your help.
Hi Eddie, If the top half is already drywalled I assume that it was hung horizontal so you would hang the bottom half horitzontal as well. If the wall is only 4 ft high and there is no connection to the upper wall then you can hang the drywall as you stated with or without the butted seams.
I very seldom hang drywall vertical but when the walls are long I do sometimes go vertical especially on higher walls. I always backblock my butted seams so they are easy to hide. Horizontal seams are easier to tape because they are at a good height and don’t require any reaching up or bending down for finishing the seams which make the finishing more difficult to get consistent.
I just taped a basement that someone else hung. It was only the long foundation walls. All the drywall was hung vertical. I can go either way on this. I was not upset that the drywall was hung vertical but I think I would have gone horizontal as long as I could get 12 ft lengths down into the basement which in this case could have been done.
All the best,
Myron
I’m with Iggy, if any of you were trim carpenters you would know how infuriating it is to have a tapered edge on the bottom of the floor where you nail your baseboard. He’s right, you never unsupported joint every 14 1/2 inches
I know this is a problem for trim guys. My uncle was a trim carpenter and I used to work for him. When I first went into the drywall business he let me know about all the problems I was causing him, such as poor fastening around window and door opening which is usually the result of framing not being properly aligned, poorly sanded or chunks of compound along the base of inside corners, poorly tapered outside corners and yes the tapered edge of the drywall.
As far as the tapered edge along the base goes I think attaching a shim along the floor is the answer. Changing the direction the drywall is hung would just create really poor quality drywall jobs. Also the unsupported edges are not a problem and are actually less likely to crack than a joint attached the entire length of the stud.
Sorry but I don’t think many drywall contractors would want to hang drywall vertical in residential construction.
All the best,
Myron
I have a crack in the seem above a doorway opening with a vaulted ceiling that keeps coming back. Should I tear out the old drywall and put in a corner joist and lay the drywall sideways to keep it from cracking again? Any advice would help. Thanks so much.
Does the Rocksplicer work for 5/8″ drywall?
Yes, Whenever I attach the second piece of drywall to the RockSplicer I push in on the drywall which helps the seam become recesses an avoids screws blowing through especially when attaching to 5/8 drywall.
I am finishing my basement and Trim-Tex’s buttboard is available locally for me. While RockSplicer is not.
What is the opinion of Trim-Tex’s product as a back blocker?
Very similar products. Both work well. RockSplicer will typically cost less once your supplier stocks. RockSplicer is the version I helped develop.
I removed a recessed can light over a dining room table leaving about an 8 inch hole. What is the best practice to patch it; the room is about 20 feet wide.
Cut two 8″ pieces of furring and insert into the hole and fasten through the drywall into the furring. You will now have something to attach the 8″ round piece of drywall to. This assumes that you were able to remove the metal frame of the recessed light. If not you will have to figure out a way to attach something to attach the drywall to. You might have to create a larger hole in order to remove the old light. Once removed you can still use the furring strip attached to the drywall method. Use a strong mesh tape to strengthen the seams and finish with 2 or 3 coats of compound
What are best methods to handle butting and finishing new 1/2″ drywall up to existing drywall. 1) in middle of ceiling between kitchen and dining where existing dining ceiling has heavy skip trowel gritty finish and I want a smooth painted finish on kitchen ceiling. + or – 24′ long (Ceiling joists are normal perpendicular to drywall). 2) new drywall on wall meeting existing smooth surface drywall painted ceiling in a bedroom (4 walls)
My idea on both would be to carefully cut through texture into drywall paper (as little as possible) wide enough to be able to apply new paper tape for the joint in both locations. Then feather out far enough to disguise the joint. But I’m just a diy so thought I should check for proper method from expert. Thanks
Butting to the textured ceiling will be difficult, but your idea may work. Have you considered smoothing out the entire ceiling? This is not as difficult as you might think.
You could also fur the kitchen ceiling 1/2″ and then when you hang the drywall it will lap over the textured ceiling. This raw edge of the drywall can then be covered with an L-bead that hides this edge and is blended into the new drywall just like a corner bead.
The inside corner of the wall will have to taped which will mean the ceiling will have to be painted. If you don’t want to paint the ceiling then you could fit the drywall as tight as possible and then flat tape this edge. It may crack along the corner which could be caulked with a very flexible caulk.
Thanks for your ideas!
I purchased 40 sheets of new USG 1/2″ ultralight greenboard to hang on a ceiling in a 7th floor high end condo renovation. The elevator is only 7′ so we have are cutting the sheets down to 4′ X 6′. The sheets have been handled with kid gloves. We noticed when we picked up the sheet and loaded them in our truck but we’ve noticed that when we slide one sheet over another in many spots the paper is “rolling up” in what seems like an abnormal fashion. Now that we are splitting the packages open and cutting them down it seems like even a very light 6′ sheet sliding rolls up the paper as well. Given the sheets were taken from a brand new factory pile and were spotless itr seems like something is not 100%. I don’t want to hang the entire ceiling to find out I got a bad lot of sheetrock and the paper is delaminating. I reached out to USG and am awaiting their tech guy to call back. Have you run across this before ?
I don’t think you received a bad batch. This just happens. You have to be very careful when sliding drywall of stacks.
I’ve got a room that’s 12 x 18 that I’m going to drywall. The current panels look like they were hung in the same direction as the joists (instead of perpendicular). I was planning to do the same, otherwise I’d have a lot of seams (three rows of sheets, each with a butt seam). If I run them with the joists, I’ll only have seams between each 12×4 sheet with no butt seams. Is that going to be horrible? To add, I think my joists are 16″ apart.
Sounds like you are hanging new drywall over the old drywall. If the ceiling joists are 16″ o c then you can attach parallel. Just make sure that the spacing will work so each seam lands on the joist. Also don’t locate a new seam on the same joist as the existing seam.
I rarely hang ceilings parallel to joists because the seams are harder to conceal and drywall is more likely to say when hung in that direction. If you are removing the old drywall and the spacing works out then go ahead and hang the ceiling parallel if you want but I recommend perpendicular and backblocking the butted seams with a RockSplicer.
This blog is extremely valuable. We recently started a drywall service and came across this article. I never thought about a hanger should be aware of where their butt joints should go but it makes perfect sense. Hanging butt joints is not the most exciting topic but you made it very informative. Thanks a ton.
Thanks, Its funny because when I go on Instagram and I see all this beautiful drywall work being done I see so many butted seams that have to be finished very wide to try and conceal. I want to yell something!! I know not too many people know about or want to bother with backblocking butted seams.
Thanks Scott, Have you used the RockSplicers?
My updated list of real, actual and life saving benefits, instead of Horizontal’s laughable nothing 2 benefits restated and inflated to as many as 5 frauds. Drywall’s not just something to paint, it’s intended to be a safety feature.
Vertical Only, here’s the proof & truth!
Here’s what’s wrong with Horizontal and why it’ll never be right:
1 – DEFECTIVE SEAM – Horizontal rows needing more than one drywall panel CREATES (instead of AVOIDS) butt-joint HUMPS, which are NOT flat and are a TWICE (minimum) the effort DEFECT. Outlet and switch cover-plates, window and door trim, baseboards, pictures, mirrors and cabinets don’t sit flat. Using ANY “butt-joint product” erases ALL “claimed” benefits of Horizontal!
2 – UNSUPPORTED SEAM – Horizontal’s tapered seam is 90% unsupported, only 10% (instead of Vertical’s 100%) contacts framing, the seam WILL AND DOES crack. Light switch and countertop electrical boxes within the seam equals MORE weakness and butt-joint doubled, MINIMUM, efforts.
3 – STRUCTURAL DEFECT – Horizontal only reinforces a wall height of 4’ or less, a full-height wall’s top-plate is never connected to the bottom-plate. As in and due to #2 above, Frictional Contact is MINIMIZED (instead of maximized by Vertical).
4 – SEAM DECEPTION – Horizontal disguises its main seam as a continuous wall weakening torso seam and then PRETENDS their 24” wide (minimum) butt-joints don’t end up 4-times wider than each of Vertical’s tapered seams. For example: a standard 20′ (240″) long wall using 4’x8′ panels, excluding adjacent wall and ceiling corners, Horizontal totals 432″ and Vertical totals 384″. Even a 9′ or 10′ long wall is 216″ for Horizontal and just 192″ for Vertical.
5 – SELF-DEFEATING ANGLES – Horizontal only uses ONE of a panel’s tapered edges and PUTS the other taper at the ceiling corner and baseboard, CREATING (instead of AVOIDING) a twisted angle that MUST be shimmed or ADDITIONALLY mudded. This too, instantly erases ALL “claimed” benefits of Horizontal by DOUBLING the seam amount, patching itself to equal Vertical!
6 – UNFRIENDLY SEAMS – Horizontal celebrates the chest height seam and PRETENDS there’s no 24”-WIDE floor to ceiling butt-joint OR the EVER present baseboard bevel of UNFINISHED WORK (Vertical has easy joints and the top’s screwed, taped and mudded later with the ceiling corner and the baseboard SPOTS can also be done separately).
7 – FIRE HAZARD LIABILITY – Horizontal only fills the coin-thin SEAM’S FACE and has NO back-blocking, CAUSING smoke and fire’s spread by inviting fuel-air for a fire’s growth (Vertical is full depth and airtight once simply screwed-in).
8 – UNSAFE INSTALLATION – Horizontal needs 2-PEOPLE for a safe installation and the panel is airborne, literally CREATING the chance to CAUSE injury (Vertical easily tilts-up with just 1-person). Panel lifters aren’t even as easy and safe as Vertical’s tilt-up.
9 – ADDITIONAL WASTE – When correctly covering a knee wall, half wall, tub front, column or soffit by first removing both tapered edges, Horizontal CAN’T use the tapers elsewhere (Vertical can and does). AND, Horizontal WASTES 4-times the mud on their completely unnecessary butt-joints AND baseboard bevel’s…if ever done.
10 – DESTRUCTIVE IGNORANCE – Foundation and Framing crews go to great pains to make everything flat, level, plumb and square. Horizontal DESTROYS those efforts with their DEFECTIVE humps and baseboard bevels (Vertical keeps the perfection).
11 – GRASPING AT STRAWS WITH OUTRIGHT FRAUD – Horizontals FALSELY AND UNKNOWINGLY wave the absurdly INVALID (FPL439) 1983 testing “Contribution of Gypsum Wallboard to Racking Resistance of Light-Frame Walls” by the self-convicted fraud Ronald W. Wolfe. FPL439 found that ALL tapered paper-wrapped edges must be FULLY INTACT for Horizontal to beat Vertical, PERIOD. In the real-world, Horizontal’s bottom paper-wrapped edge is REMOVED BY LAW, for spacing from all floors and thereby COMPLETELY NEGATE Wolfe’s inexcusably deceitful and worthless “study” (LAUGHABLE) and summation.
12 – JOINT OR SEAM TREATMENT – According to the ASTM’s C840 8.2, Horizontal’s seams MUST be mudded to provide ANY fire, smoke and air travel resistance (Vertical’s SO GOOD that it’s NOT REQUIRED to have its seams treated AT ALL).
13 – COSTLY SLOW COMPLICATION – Horizontal’s depend upon PRICEY special muds and even messy tape or taping tools that WASTE mud. Taping tools still require a 2nd step of knifing the tape and the muds require a mixing step. That’s MORE expense, MORE time, MORE tools and equipment and MORE water…for an INFERIOR job! Vertical’s SUPERIOR with the cheapest ready-mix bucket muds and dry self-adhesive tape. Again, Vertical’s seam treatment is JUST for looks.
14 – FIRE RATING FAIL – Most Single-ply or Single-layer drywall for Commercial Work is required to be installed Vertically, to obtain drywall’s ACTUAL fire rating. This is well-known by the majority of Horizontals, but you and your children don’t matter to a Horizontal. And for what, to honor the FRAUDS that taught them wrong?
You’ve now seen that Vertical’s FASTER overall and immensely BETTER in every way.
Only promote HORIZONTAL AS WRONG and confidently cite the above incontestable FACTS.
For walls (e.g. an 8 foot wall), wouldn’t it be easier to run the boards vertically, float the factory seams between the studs, and back/splice them with a flat piece of plywood/MDF? That would mean that you only have factory edges to finish (no butt joints), and your factory edges would have the same type of support that your butt joints would have when using a Rocksplicer.
I guess you could. Maybe if I was forced to hang vertical the backblocking with furring would be a good option if stud spacing started to run off or if there are a lot of bowed studs. I still prefer horizontal even if I will end up with a few butts. I just hung a basement where I could only get 8′ drywall down the stairs so I mostly hung vertical. I think I will have a few seams that are kind of ridged though.